Pacific Northwest native plants have a reputation for being self-sustaining, but that resilience is an earned trait of mature root systems, not an automatic feature of a four-inch pot or five-gallon container. When you install a new planting in Western Washington, you are placing nursery-grown roots into native soil profiles that range from compacted glacial till to rapidly draining river sands. The plants may eventually tolerate our Mediterranean-style summers with little to no supplemental water, but they cannot do so during their first few seasons in the ground.
The transition from a nursery container to an integrated part of your landscape can take roughly two to three years. During this window, your primary job is not to leave the plants to fend for themselves, nor is it to adhere to a rigid, twice-a-week watering timer. Successful establishment requires an observation-led routine that responds to actual soil moisture, seasonal shifts, and physical signals from the plants themselves.
The Gap Between Adaptation and Establishment
A fully established native shrub or tree has an extensive root architecture that mirrors or exceeds its canopy width. These roots mine deep soil layers for residual moisture long after our late-spring rains stop.
A nursery-grown plant, by contrast, possesses a confined root mass grown in an artificial, peat- or bark-based potting medium. When installed in native Puget Sound soils, that porous nursery mix dries out much faster than the heavier surrounding ground. If moisture cannot bridge the gap between the original root ball and the native dirt, the plant experiences drought stress even if the adjacent soil feels damp.
Puget Sound weather complicates this transition. While our region is known for precipitation, our climate features prolonged summer droughts. Most of our 35 to 40 inches of annual rain falls between October and May. Between late June and late September, rain is often negligible.
Expecting a newly planted native to survive an August dry spell without supplemental water confuses long-term ecological adaptation with short-term survival. Your plants need targeted hydration to build the infrastructure that will make them drought-tolerant in the future.
Ditching the Calendar: Reading Soil and Weather
Rigid watering schedules waste water and kill young plants through either deficit or drowning. A timer set to run every three days does not account for a sudden May heat wave, a lingering overcast spell in June, or the difference between a south-facing slope and a shaded hollow against a cedar fence.
Instead of watering by the day of the week, build your routine around five site factors:
- Plant and Site Fit: Species naturally found along streambanks or shaded ravines need more early moisture than those native to dry gravelly prairies.
- Season and Sun Angle: Moisture loss is far higher under high July sun angles and prolonged day lengths than during warm, overcast May afternoons.
- Existing Soil Texture: Glacial till holds moisture near the surface but drains poorly once saturated; sandy or gravelly loam drains quickly and requires deeper, more frequent soaking.
- Exposure: Areas near heat-retaining structures, reflective windows, or exposed to continuous maritime breezes dry out significantly faster than sheltered interior beds.
- Recent Weather: A light summer drizzle rarely penetrates through the canopy or mulch layer. Always confirm whether natural rain reached the root zone before skipping a cycle.
Checking the Root Zone
The only way to know if a plant needs water is to check the soil beneath the surface. Brush aside any mulch layer near the base of the plant and insert a finger, trowel, or wooden dowel three to four inches down, right at the boundary between the nursery root ball and the native soil.
If the soil at that depth feels cool, pliable, and clings slightly to your skin, moisture is sufficient. If the soil feels dry, dusty, or crumbles easily, apply water.
When you do irrigate, deliver water slowly and deeply to soak the entire root profile and encourage roots to grow outward into the surrounding ground. Brief, shallow sprays encourage roots to stay near the surface, leaving them vulnerable to heat.
For property owners managing larger layouts, setting up efficient distribution like drip irrigation for new Seattle plantings offers an effective way to deliver measured volume straight to root zones. However, automated systems still require regular manual soil checks to verify that water reaches the intended depth without over-saturating the base.
Mulching for Moisture and Soil Health
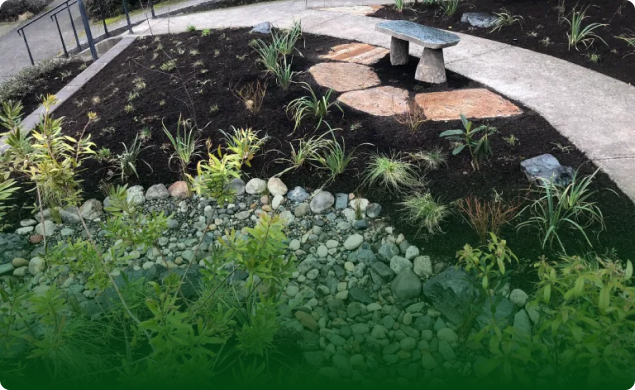
Mulch is the most effective tool for moderating soil temperature, reducing evaporation, and preventing the surface crusting that causes irrigation to run off. In our region, clean, coarse arborist wood chips are the standard for ecological plantings. They break down slowly, feed beneficial soil fungi, and mimic the natural organic duff found on Northwest forest floors.
Application technique matters just as much as material choice:
- Maintain Depth: Keep a continuous layer between two and three inches deep across the entire planted bed. Thinner layers fail to block light and suppress evaporation; layers deeper than four inches can impede oxygen exchange into the soil.
- Clear the Crowns and Stems: Never pile mulch against the stems of shrubs or the root flares of trees. Piling material against wood tissue traps moisture against the bark, creating an entry point for fungal decay and boring insects. Leave a bare collar of two to three inches of open space around the base of herbaceous perennials and shrubs, and several inches around tree trunks.
- Cover the Gaps: Ensure the transition zone—where the nursery root ball meets the landscape soil—is fully shielded by mulch to prevent the rapid evaporation typical of container soils.
Avoid fine-textured bark dust or dyed mulches. Fine bark often compacts into a water-repellent mat that sheds summer irrigation, while raw wood chips allow air and water to pass through freely while shielding the earth below.
Weed Management During the Establishment Window
A newly installed landscape has substantial open ground between young specimens. Until those plants mature and fill the canopy, airborne seeds from opportunistic weeds will attempt to colonize the bare spaces.
Weed pressure is more than an aesthetic issue during the first two seasons. Aggressive weeds directly outcompete young natives for available soil moisture and nitrogen. A thick patch of deep-rooted weeds can desiccate a bed faster than summer sun, depriving developing roots of essential water.
Manage weeds through persistent, low-impact habits:
- Pull Early and Often: Remove weeds when they are small seedlings. At this stage, their roots can be extracted without disturbing the fragile, establishing root systems of nearby natives.
- Target Before Seed Set: Never let weeds reach the flowering or seeding stage. Preventing weed seeds from entering your mulch layer saves hours of labor later in the season.
- Preserve the Soil Profile: Hand-pull or slice weeds just below the surface with a hand hoe rather than rototilling or deeply digging the bed. Digging churns buried, dormant weed seeds up to the surface and severs the fine lateral roots of your new plants.
- Avoid Chemical Controls: Relying on chemical weedkillers damages the soil microbial and mycorrhizal networks that native roots depend on to establish self-sufficiency. Consistent hand cultivation coupled with adequate mulch coverage keeps weed pressure manageable without compromising soil health.
Reading Plant Signals
Plants communicate their establishment progress through predictable developmental markers. Learning to separate regular seasonal shifts from distress signals allows you to adjust your care routine before structural damage occurs.
+---------------------+---------------------------------------+------------------------------------------+
| Observation         | Healthy Establishment Signal          | Stress / Action Signal                   |
+---------------------+---------------------------------------+------------------------------------------+
| Root Stability      | Firm resistance to a gentle tug test  | Plant rocks loosely in soil after season |
| Foliage Condition   | Steady leaf color, evening turgidity  | Persistent afternoon wilt into morning   |
| Shoot Development   | Plump seasonal buds, measured growth  | Premature dieback from leaf tips inward  |
| Moisture Patterns   | Soil dries down evenly over days      | Water pooling or repelling at surface    |
+---------------------+---------------------------------------+------------------------------------------+
Healthy Growth Indicators
Healthy establishment does not always mean rapid above-ground growth. In the first year, many native species direct their energy downward into root development. Useful positive signs include:
- Anchoring: A gentle, low-pressure tug on the base of the plant meets firm resistance. If the root ball lifts or rocks loosely in the soil after several months, roots have not yet moved beyond the original planting hole.
- Firm Bud Formation: In late summer and autumn, the plant forms plump, firm terminal buds along its stems, signaling preparation for winter dormancy.
- Turgor Recovery: Foliage may flag slightly during an 85-degree July afternoon, but recovers its posture and firmness by the following morning once temperatures cool.
Signs of Stress and Bed Patterns
When plants struggle, observe the timing and distribution of symptoms across the bed:
- Persistent Wilt: If foliage remains limp or curled in the early morning before the sun hits the bed, the condition warrants closer observation of moisture, drainage, and site context rather than a single-cause conclusion.
- Tip Dieback and Margin Scorch: Browning that starts at the outer edges of the leaves and works inward typically indicates that moisture cannot keep pace with atmospheric demand.
- Microclimate Failures: If several plants along one edge of a bed show uniform decline while identical plants ten feet away thrive, examine the physical surroundings. Downspouts, roof overhangs creating rain shadows, or heat radiating from concrete foundations often create localized zones that dry out or flood faster than the rest of the planting.
Avoid jumping to conclusions about plant pathogens or insect damage when you see discoloration or defoliation. Visible decline can reflect several site, establishment, or care conditions and should not be diagnosed from appearance alone.
When Decline Points to Site Fit, Not More Inputs
A common reaction to a struggling plant is to increase water, apply compost, or search for amendments. However, when a native plant repeatedly declines despite attentive watering and mulching, the pattern can indicate a site-fit issue worth reviewing.
Pumping more water into a low-oxygen, poorly draining clay pocket will not help a plant that requires dry, open soil. Similarly, increasing the irrigation frequency for a woodland understory species planted in full, reflective afternoon heat will only scorch the foliage while rotting the roots.
This is where thoughtful native plant landscape design proves its value. A sustainable planting depends on matching each species to its natural hydrological niche, sun exposure, and soil type. If an individual plant continues to show systemic decline across an entire season while neighboring species with different requirements perform well, the most ecological response is not to force the issue with artificial inputs. It is often far better to move the struggling plant to a suitable microclimate on your property—or replace it with a species tailored to that exact spot—than to spend years fighting the site.
A Natural Trajectory Toward Independence
By the second and third summers, your observation routine should shift. You will find that the soil stays cool longer under an expanding leaf canopy. The gentle tug test will confirm that roots have anchored firmly into the native substrate, and the plants will tolerate longer intervals between waterings.
Establishment is not an overnight event, but an ongoing reduction of intervention. By focusing on your soil, adjusting to seasonal patterns, and reading plant responses clearly, you provide the early support your landscape needs to become the resilient, low-maintenance native system it was planted to be.
If you are seeing persistent decline across a newly planted bed and suspect the layout does not align with your yard’s underlying soil conditions or exposure, reach out to Rutheo Designs. I can review your space, assess your site conditions, and help you determine whether your layout needs targeted adjustments to succeed over the long term.